Thursday, December 13, 2012

Holiday Tree Quickie


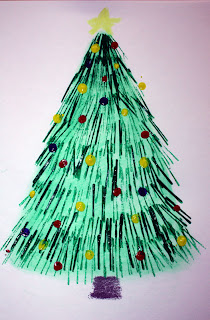
We made these holiday trees today in the art room and the kids were so excited.  I used this plan for kindergarten, first, and pre-school and all levels were able to do them in one sitting with time left over for a holiday story.  First graders started their tree by drawing a big triangle then filling in with the side of a chalk pastel.  The idea is to get a little color on the page.  We blended the chalk with a tissue to soften the color.  Next, we added evergreen branches by stamping with the the edge of a small piece of cardboard.  When the branches were done the pastels and green paint was picked up and kids were given a palette with red, green, and blue paint.  They used one finger to dot on the lights and decorations.


Here's what I learned in doing this project....almost everyone wanted a star on top of their tree, so for the second class I had yellow pastels ready and we added that detail right from the get go.

Also...the project got a bit messy with the first kindergarten class. Chalk everywhere.  For the second class we used crayons to color the big green triangle, and the star.  We stamped as usual, but skipped the finger dotting.  They added decorations with the eraser end of a new pencil.  

For my pre-schoolers I drew the big triangle for them and they colored it in with crayons, stamped, and dotted.   Everything done in on session and ready to hang on the fridge for the holiday.

This lesson was inspired by the amazing blog Creativity First.  Check it out here.
Monday, December 10, 2012

Poinsettia to Do Today


If you're looking for a quick holiday project idea that you can do today and cover the idea of tints, shades and complementary colors this is it.  This was a fun and engaging for my sixth graders.  The painting can be done in a day, but we discovered the project looks great if you take the time to cut out the flowers and mount them on red paper.  That's what we did with ours.  We got tons of compliments on them and they are on their way to deck the stage for the holiday musical.  Sorry I don't have photos of that step, but we experienced a bit of a time crunch this afternoon.
To make our poinsettias students used a piece of light colored chalk to mark out the place for the center of the flower.  Magenta was added to white to make the pink tints.  My students began by painting in a few radiating lines, like spokes on a wheel to keep their petals straight.  More petals were added to fill out the flower.  A bit of green was added to white to make a tint of green for the leaves and the leaves were painted in.  We didn't bother rinsing our brushes today, just wiped them on a paper towel between color changes.
Using a smaller brush green veins were painted on the pink leaves and pink veins were painted on the green leaves.  We dotted in the center of the flower with the back of the brush.
Cut loosely around the flower when dry leaving a bit of white paper and glue on red background....Stunning!
This is not my project...I found it on Pinterest.  Unfortunately it was an "uploaded by user" photo without a source.  If this is your project please leave a comment so I can credit your fabulous idea.


Friday, December 7, 2012

Scratch Art Owls


Grades 3, 4, and 5 have been working on Scratch Art this month. Here is some fifth grade work that turned out really well.  We made our own rainbow scratch boards for this project and reviewed the colors of the spectrum in proper sequence then used crayon to lay our base layer down in an interesting pattern.  Black oil pastel was used to cover the crayon and a rough draft design was created from reference photos.
When students were happy with their design the transferred it to the scratch board by laying the sketch on top of the scratch board and going over their lines with a pencil.  The faint transfer lines were etched into the scratch board with the end of a Popsicle stick and patterns were added.  


Wednesday, December 5, 2012

It's Pumpking Time!


I guess you know you're behind on posting when still posting fall things as winter begins.  This lesson has been floating around the web and is so cute I thought I'd give it a try this year and found it to be a great early art activity for the little guys.  I'm on the cart and am always looking for ideas that are easy to organize and implement in the kindergarten room and this fit the bill, plus it gave us time to work on naming and  cutting basic shapes, practicing careful gluing, and arranging shapes to represent the features of the face.  
To begin I gave each child a black 9 X 12 inch paper on which I had glued a large white oval.  We read "It's Pumpkin Time", which is available in big book format.  We mixed up some orange paint and painted our pumpkins on day one. 

On day two students were shown how to cut a circle from a square by carefully snipping the corners, and how to cut an oval from a rectangle in the same way.  Long strips of paper trims were handed out for snipping teeth. 
I've switched over to using Elmer's tiniest glue bottles for all my students.  Yes, they're kind of a pain to refill, but they are easy to handle and don't clog up like the big bottles.  We practiced opening and closing the bottles and using small dots of glue.  I love these little bottles because kids don't seem to engage in excessive squeezing or become mesmerized with falling glue like they do with the larger size.
I really love Shari Halpern's illustrations in  "It's Pumpkin Time". so bright and cheery.  And the big book format can't be beat.  I found a cute little" life of a pumpkin" sequencing PDF to use as a filler activity for early finishers and you can check it out  here .
Another lovely book illustrated by Shari Halpern that would be a great accompaniment to apple printing or other fall inspiring art.

A little late for this year, but bookmark it for next year!  Love those robins.

Saturday, October 27, 2012

Happy Halloween


Happy Halloween!  Hope all my friends in the northeast stay safe and dry this week as Hurricane Sandy makes landfall.  Sounds like this is going to be a big one!  We have our flashlights ready and will be pulling out the generator to keep the little pellet stove running in case the power fails.  

Friday, October 19, 2012

Blowing Leaves Watercolors


Here's another seasonal watercolor that students are finishing up this week.  These took a few weeks to complete, but the results are impressive and the lesson reinforces important art concepts and techniques.  These are third grade examples, but this lesson could (and was) adapted for a variety of grade levels.

The objective of the lesson was to create the rhythm and movement of falling or blowing leaves through repetition. 
  
To begin each student traced or drew a simple leaf shape and cut it out.  Using their leaf cut-out they repeated shapes on their paper to create a pleasing composition.  To keep things interesting, they were asked to demonstrate shapes that were separate, touching, overlapping, and running off the page.  They traced their shapes pressing hard with crayon.

On day two, we reviewed the concepts of positive and negative space, and cool colors, and wet-into-wet watercolor techniques.  Students painted the negative space using cool colors using wet-int-wet technique.
On the third day students we talked about warm colors and students began working on leaves.  We talked about the need for drying time when using watercolors to prevent color bleeds, too.  I also showed students how to scratch veins into the wet paint with the back of their brush another new technique for these guys.

The third day was "finish-up" day.  Students who had completed previous work on schedule did some black outlining.  Gold paint could also be added with a fine brush for early finishers.


Wednesday, October 17, 2012

Vermont Fall Trees

These little watercolors were a big hit with my third and fourth graders and yielded a great result.  This is a project you can start in the morning and hang in the afternoon to enjoy before the leaves really do fall which is about to happen suddenly up here in Vermont.

To make these paintings you will need: Reference photos that show a variety of tree shapes and structures, a piece of paper, a paint box, and a couple pieces of chalk.  That's it.

Each child started with a 8X5 piece of paper.  Use the side of the chalks to lightly tone the paper.  We used yellow and green for the ground and blue and violet for the sky.  Blend the colors with a paper towel to make them light, misty, and very atmospheric.

For the tree mix a little black and brown in the lid of the watercolor set, or any color you like.  Start  the trunk and a long tapering line.  Add 2 or 3 thick branches on each side.  Make Y-shaped branches at the end of each branch.  Fill in more branches as needed to balance your tree.

Stipple in leaves.  Have your paper towel handy for this step because you will need a relatively dry brush.  Mix e red, yellow, green and orange paint with water in your set.  Dry your brush really well before picking up paint.  Stipple a little on your paper towel to adjust the wetness in your brush and when everything is right, stipple the leaves on your paper.
Kids loved making these little paintings.  And like I said...you can start them in the morning and hang them in the afternoon.
Happy painting and enjoy those fall colors.


Wednesday, July 25, 2012

More Flower Mandalas for You


I've had mandalas on my mind this week, and here's some more mandala fun.  If you don't want to risk poison  ivy in constructing your mandala you can use flowers from the florist or the the grocery store, but these were made the old fashion way, with leaves and petals we picked in the garden.  After photographing our mandalas I uploaded the photos to Sumo online because I wanted to check out their kaleidoscope effect and found it super simple and completely mesmerizing to move the image around until it was "just right".
When I say easy, I mean easy enough for a child to do it.  Upload photo, go to filters, choose distort from the drop down menu, then click on Kaleidoscope.  That's it.  When you have everything the way you like it save or print.  That's it.
You can use the kaleidoscope effect with any photo you have on your computer, or with any photo you find on-line.  
Check it out.  Here's the link:  Sumo on line.
Enjoy!

Tuesday, July 17, 2012

Throwing Pots on a Car Axle in India and Beyond


No pottery wheel?  No worries.  These gentlemen will show you how to rig a wheel up in your own back yard.  

Saturday, June 30, 2012

Common Core Standards-Freebie

I like referring to Core Standards to guide me in making connections between art and classroom learning but I don't like plowing through them.   Now, thank you to Hopkins Hoppin Happenings there's a way to keep the standards organized and accessible.  See that little tab way over in the right hand margin. It's my new Common Core Standards Widget.   Click on it out fall the standards neatly organized by subject and by grade level.  Because it's so easy to use, I know I'll be checking in with it often.
Try it by clicking on the tab on the right, or hop over to Hopkins Hoppin Happenings or get the code.  The common core is available as widget or app.

Sunday, June 3, 2012

Easy Tissue Collage Bowls


These easy glue and tissue paper bowls are another project that will help empty the scrap box before the school year ends and a great way to use up any colorful bits and pieces of paper, yarn, raffia, a fabric left over from other projects.


To make them cover the bottom of any bowl with plastic wrap and tape to secure.  I chose disposable paper bowls for our mold, because I had them on hand and they were small enough for kids to finish in one sitting.  For sake of time I covered the bowls before kids arrived.  I also filled some cups up with white glue thinned with water (about half and half).
Students wrote their names on the tape inside the bowl then flipped them over and brushed glue onto the plastic wrap.  To keep it simple, our motto was 4-4-4...begin by arranging four pieces of colorful yarn, then place four layers of tissue paper, and finish with four pieces of yarn.  Kids brushed glue on each piece of yarn as it was added, then on each bit of paper.  They ended with more colorful strands of yarn, tinsel, feathers, raffia, etc.  brushing glue as each item was added.


Let the bowls dry and gently peel the plastic wrap away....Done.

Thursday, May 10, 2012

Sandy's Circus--Back By Popular Demand


                                                          "Circus Pony and Her Trainer"

Alexander Calder's Miniature Circus is well loved by my students and a favorite with my fifth graders who remembered when we did it way back when.   I had a special request by one of my students to bring it back this year.  Great idea!  This lesson provided a fun break from the intensity of portrait drawing and also a wonderful way to deplete, or at least make a dent in, the ever-growing "scrap box"...the place where bits and pieces and all the left-overs go all year long.

Students began by revisiting "Cirque de Calder" ".  We brainstormed a huge list of  circus acts together as a group and talked about the wonder of creating miniature worlds. We looked at pictures of various circus posters and acts.   Kids chose three of their favorite circus acts to sketch  in their sketchbooks paying special attention to costuming and props.  Kids chose their best ideas and began building their acts.  Some work is still in progress, but these were finished today.

"Anna's Trapeze"  The slightest breeze sets the little figure swinging.

"Tight Rope Walker"  about to step onto the wire.  Love her bathing suit.


   "Giraffe Rides!"  What fun!  This  giraffe has a long ribbon neck.  This artist included movement in her sculpture by attaching the head to a string so the toy could be interactive.

                                              "Bear Act"  a dancing bear with it's trainer.

"Fire Dancers and Jugglers" in a fancy beaded ring.

Monday, April 30, 2012

The Amazing Dale Wayne

Sixth Graders were inspired by the work of instillation artist Dale Wayne to create a little bit of  community artwork of our very own.

We looked at Dale's work on her website, watched a few video clips, collected bottles then broke out the paint and the glitter.  We painted our bottles with tempera paints mixed with a bit of acrylic gel medium.  While the bottles were still wet we dragged them through glitter and set them aside to dry.


In the next class we cut the bottles into flower shapes, poked a hole into the caps and created extravagant centers for our blooms from sparkle pipe cleaners, straws, and other do-dads from the scrap box.  The bottles can also be doubled up for a fuller flower.  We continued paint, glitter, and working on blooms for three classes and each week added to the mass of flowers on the corner of the bulletin board.
 

Lots of glitzy fun!  But not for the faint of heart.  Make sure to have the broom and the dust pan ready because the glitter was really flying with this one.


We used the cheap dollar store "glitter".  It's big.  It's shiny.  It's all over the place.


To learn more about this artist check out the video.  I can't wait for Christmas...check out her amazing water bottle Christmas Trees at Inspiration Green


Thursday, April 26, 2012

Trouble in Blog Land

Big milestone.  I reached my free photo storage limit on Picassa.  I knew I was getting close to the limit, but like Scarlet O'Hara decided I'd think about that tomorrow.  Well, tomorrow came yesterday when blogger refused to allow me to post any more photos.  I don't really want to purchase web storage even if it's really inexpensive because I'm cheap and would rather spend my money on other stuff.  
I figured out that images that are sized 800 pixels and smaller don't count against the limit.  So today I'm going to try uploading smaller images.  Not too excited  loosing all those pixels.  So sad.  I guess it will have to do for the time being until I figure something else out.

Has this happened to anyone else?  What did you do to solve the problem?

Here's our contribution to the 2012 art show.  Enjoy!