Wednesday, March 28, 2012

Barefoot in the Grass


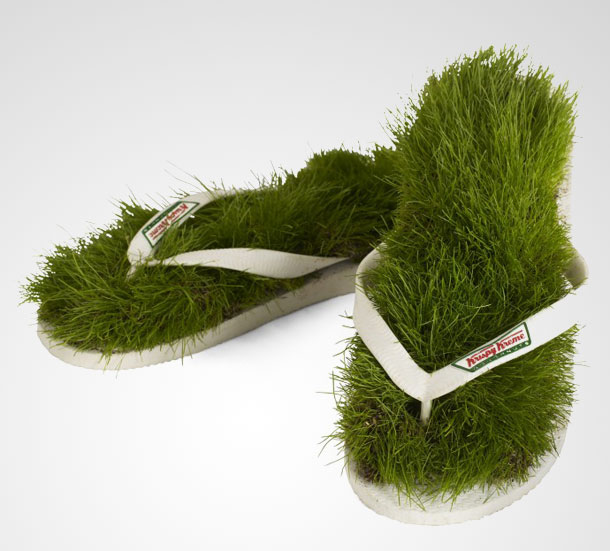
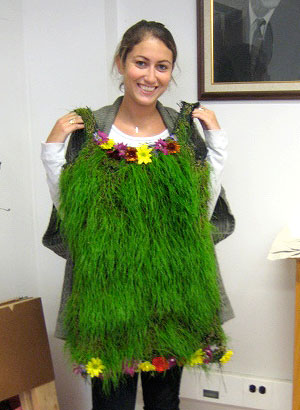
Doughnut maker Krispy Kreme designed the world's first grass flip flops to relax city workers by giving them their own mini-park to walk around in.  I found them here.  You can see I've been on a grass kick lately, noticing grass sculptures around the net. I am, for instance, completely enamored with this little grass dress created by a Cornell student.  Really cute spring fashion.


Growing grass on a pair of flip flops is easy enough, but I got to wondering how to grow grass on objects with vertical surfaces, like the car in the previous post.  I guess it's a case of a little bit of knowledge being a dangerous thing, because I found this a church interior covered in grass along with the explanation of how it was done. You can read the step by step for yourself, but


in a nutshell, the walls are smeared with moist clay, then seeds are pressed into the clay.  The wall is watered to keep the clay moist.  The whole shebang lasts about 20 days before it starts to deteriorate.

This opens the door to a lot of possibilities in my mind.  Nothing on the scale of an entire church, but I have clay and I have grass seed.  Maybe a little grass graffiti is in my future.  I'll keep you posted. 


Monday, March 26, 2012

Seed Head Sculpture

We took inspiration from Danish artist Morten Flyverbom who covered this VW Beetle in grass as part of his collection of ecological art pieces, and celebrated the spring season by creating these soft, seed-head sculptures.  They're called seed-heads because their heads hold a teaspoon of grass seed and will soon sprout. (At least we hope they do).


To make them, students stuffed a nylon sock with sawdust after dropping a teaspoon of grass seed into the toe.  The nylons were tied off  and kids molded their heads by pinching out features which are held in place with rubber bands.  We used sharpies, cut foam pieces, and wiggle eyes to add personality.  Hot glue guns attached everything in place.
To start the seeds we dipped the top of the head in water for a ten-count and then  placed the figures upright in a cup of water.  The tail end of the nylon theoretically acts as a wick.
The nylon knee-highs cost 33 cents a pair and we got four seed-heads out of each pair by knotting the sock once and cutting in half.
The kids are really excited to see them sprout, and so am I.

Tuesday, March 20, 2012

Giant Coil Pots Are Fun

I planned to start a clay unit with my 4/5 combined art class today, but half my students were out of the building on a field trip today while the other half was raring to go.  After considering a few different options the kids chose giant coil pots as the activity of the day.  Easy for me and good practice for them.  They broke into groups to see who could build the biggest coil pot.  A whole lot of clay later here's the winner.


These big pots were really amazing, and the kids loved working together to build them.  As much as we loved them we recycled the clay at the end of the day so that we'd have it for later use.

Monday, March 19, 2012

More Portraiture

Sixth graders have finished work on their portraits and began assessment today.  I'm really impressed with everyone's effort during this unit.  Our learning goals were to draw a realistic portrait that demonstrates proper proportion and placement of facial features and to use value to show form.  Students completed a variety of practice exercises before starting on their final portrait which the drew from a black and white photo reference.
In looking back over their work today I found a couple of pre- instruction portraits tucked into sketchbooks and I'm posting them   too so you can see the growth and progress.

If you are looking for some good links to use in teaching pencil portraits their a lots of great videos on YouTube that will help students get started and don't forget to check out Mr. Curkovic's  link.  Lot's of great info, plus a solid rubric.


Paige After
Paige Before


Brendan's After
Brendan's before

Tuesday, March 13, 2012

Sixth Grade Self-Portraits

Sixth graders are finishing up their self-portraits this week and I'm really proud of their progress.  Our focus has been on proportion, placement, and value in drawing realistic portraits.  We did a lot of work in our sketchbooks where we created a value scale, and practiced drawing individual facial features.  The final project was to create a realistic self-portrait using what we had learned.  To create these, students began by toning the paper lightly with their pencil.  They worked from a similar size black and white photo.  To help with placement students folded their photo two ways and drew corresponding lines on their paper dividing it into four blocks.  Working with one feature at a time students found they could use the center point as a handy reference for placing things correctly on the page.  The lines were erased out as the went along.
Nice job sixth grade.  

Monday, March 12, 2012

Free Trial--KIVA Loans that Change Lives


If you follow my blog you know I love free stuff so I'm re posting this free offer from KIVA today.  This is such an amazing organization and once you get started I guarantee you will be hooked watching your tiny donation pass from hand to hand as it travels the world helping person after person.  Enough said...here's the post.  I hope you'll check it. 


We have $1,000,000 sitting in the bank -- and we want you to help us spend it! 
Kiva Board Member Reid Hoffman, best known for founding professional networking site LinkedIn, has put up $1 million to give new users a chance to try Kiva for absolutely free! Simply by signing up, new users can make a $25 Free Trial loan and see the incredible impact of microfinance firsthand.

Our theory: The more people who see the power of lending at work, the more who will want to get involved. We're looking to grow the Kiva family and connect even more lenders to more borrowers. When a new user joins, they'll get to choose a borrower to loan to, get all the updates on how that borrower's doing, and watch them repay as their business grows.

These free trials will allow Kiva to introduce 40,000 new lenders to microfinance, creating a massive ripple effect that will help many more thousands around the world. When you loan through Kiva, you're not just supplying funds -- you're also supporting our field partners, who offer a range of other services to borrowers from health care to savings accounts to child nutrition classes. Just think what loans from 40,000 new users could do!

We hope that taking part in this process will inspire many of these new users to come back, lend their own money, collect repayments and do it all again. That's the beauty of Kiva -- once you invest, your money can help make change again and again and again.

The outpouring of support and lending during our first -- albeit much smaller -- Free Trial program last year resulted in 8,000 new lenders in a day! We're hoping to go even bigger this year -- and you can help! Invite your friends, your family, your neighbors and co-workers. Tweet, Facebook and email. Now's your chance to get that person you've been talking to about Kiva forever to actually try it out!

Many of our current lenders describe Kiva as “addictive.” Share your healthy addiction by inviting your friends and family to experience microfinance for free. There is no limit to what we can do when we join forces to alleviate poverty!

Got questions? Interested in doing more to help spread the word? Send us an email at blog@kiva.org.
<< Kiva Updates

Wednesday, March 7, 2012

Vermont Farms and Barns


Artists are off to a good start drawing Vermont Landscapes.  I think they did a great job, perhaps because it's a subject near and dear to our hearts.  This lesson was inspired by Josette Brower at  Georgetown Elementary Art.  Our learning objective was to practice drawing 3-D shapes, cubes and cylinders, and to draw a barn and silo in perspective.  We practiced once and then kids started their paintings.  No under drawing was necessary.     The only rule I gave the kids about the project was that the barn could be placed anywhere on the page except the very bottom of the paper.  We talked about leaving room for the animals to get in and out of the barn, and I wanted my youngest artists to experience creating space in their landscapes. 

Josette's students placed their barns in a winter landscape, but I think we'll go for spring so we can put the green in the Green Mountain State. Here are some examples of first, second, and third grade work.  Can you tell which is which...hmmmm.

Kids love learning to draw basic forms using perspective.  It's so exciting and this project was a big hit....Thanks Josette Brower!  Can't wait to add color.


Tuesday, March 6, 2012

Kindergarten Stuffed Owls


Kindergartners built these colorful owls last week.  Students made the body by tracing around a template  They then used their crayons to draw in additional details to personalize their owls.  We are learning how to combine simple shapes and lines to create complex imagery.  Students created texture on their owls by adding  lines and patterns.  Look at the beautiful patterning on this little guy!
We are practicing watercolor techniques, brush control, and learning to care for our materials.
After our owls were dry they were stapled to a backing paper (colorful craft paper from the roll) and cut out.  We stuffed them with paper from the paper shredder and added a loop of yarn for hanging.
Note to self:  shredded paper + kindergarten = big mess.  If you do this, bring a broom.
Next time:  crumpled paper from the recycle bin or project leftovers.